 Many years ago I used Remote Installation Services (RIS) on a Windows 2000 Server to install Windows 2000 Pro and Windows XP to clients on my network. Sometime in the Windows Server 2003 timeframe RIS evolved into the much improved Windows Deployment Services (WDS). I left that job and as time went on never really needed to use it since, until the other week. I was given a netbook with broken USB ports and a dodgy copy of Windows XP on it. Installing a fresh copy of XP over the network seemed to be the easiest way to do this. I was wondering how things had changed now Windows 7 & Server 2008 R2 have been released. I could remember it involving lots of huge downloads like the Windows Automated Installation Kit (WAIK) and the Microsoft Deployment Toolkit. I also am only going to be using it on rare occasions so I don’t need any of the Microsoft System Centre bumph.These always seemed like overkill for the simple task in hand. Doing a few Bings and Googles didn’t really seem to bring any up to date information so I ended up piecing together the info from lots of different blogs to get to the end result. I have included the steps I took (below) in case it is of any help to anyone else out there. I’ve kept them quite vague on purpose as putting to much detail tends to overcomplicate the matter, therefore, you do need some technical knowledge to get through this successfully.
Step 1 – Install WDS
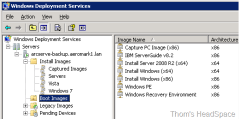 Install the Windows Deployment Services server role (I used a Windows Server 2003 R2 x64 box but more recent Server OSes are much the same). You can accept all the defaults but you may want to install it to a disk with enough space to store the images.
Open the WDS management console
We need to add a “Boot image” to give WDS something to load when the client asks. I used the boot.wim file from a Windows 7 DVD (in the SOURCES folder). Give it a name like “Install Windows”. This will take a few minutes to copy to the WDS server.
After it has been added, right-click the “Install Windows” boot image and choose “Create Capture Boot Image”. A new wizard starts. Give the capture image a useful name like “Capture PC Image” and save it to anywhere you like. After the capture image is created you need to add it as a boot image exactly the same way you did with the Windows 7 DVD. Its a bit bizarre it doesn’t do this automatically but hey-ho.
We now have everything we need on the server side.
 Step 2 – Create a Reference PC
Because we want to deploy Windows XP we have to go through the faff of creating a reference PC. With Vista and later you can just copy an install.wim file from the DVD exactly like you did when adding the boot image.
Choose a spare PC and install Windows XP SP3 on it
Download and apply all Windows Updates including things like Internet Explorer 8 and Windows Media Player 11.
Don’t worry about installing drivers as we are trying to create a small generic image that can go onto most PCs without blue-screening. Therefore, the less installed on, it the better. Also, don’t bother installing any applications to it unless you have licenses that can be easily reapplied. Chances are, especially with free software like Firefox, that by time you want to use the image again there will be newer versions online.
Once all patches are applied I tend to defrag the hard disk. I don’t know whether this makes a massive difference but it makes me feel warm and fuzzy inside.
Step 3 – Preparing the Reference PC for Capture
We need to strip the reference PC of any unique names, Security Identifiers (SIDs) etc. before we can capture it. Thankfully, we can use a tool called SysPrep (from the XP CD) to do this. We can also provide a script to automate most of the initial setup routine when it eventually gets deployed. From the XP CD extract the contents of Drive:\SUPPORTTOOLS\deploy.cab to a folder “C:\sysprep” on the reference PC.
- Run C:\sysprep\setupmgr.exe – This will launch a wizard to create an answer file to automate installation.
- Type of Setup: Sysprep setup
- Product: Windows XP Professional
- License Agreement: No, do not fully automate the installation*
 Carry on through the wizard filling out the relevant info like Company Name, Languages, Time Zone etc. Remember the less you put in, the more generic the image will be. When you get to the end of the wizard there is no “Finish” button, just use “Cancel” instead and save it to the sysprep folder. Warning: Do not encrypt the admin password as it will cause the script to crash during deployment.
*Microsoft where very helpful when they released Service Pack 3 for XP. This is because you no longer need to put a license key in during set up. This is very useful for people that don’t have special volume licensed media, just the OEM CD that comes with the box. However, Setupmgr doesn’t let you fully automate the install if you are leaving the product key blank.
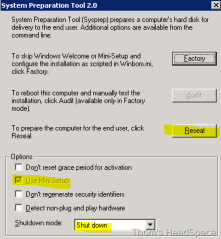
- Run C:\sysprep\sysprep.exe
- Click “Yes” to the agreement warning.
- Tick the box “Use Mini-Setup”.
- Shutdown Mode: Shutdown
- Click the “Reseal” button.
Sysprep will do it’s thing then shut down. We are now ready to capture the image
Step 4 – Capture the XP image
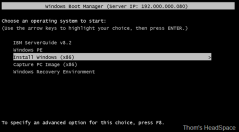
Boot from the network (you may need to configure this in the BIOS) and hit F12 to launch WDS. Be quick otherwise the PC will load Windows and start going through the mini setup. No biggie but you will need to sysprep again.
Choose “Capture PC Image” from the WDS options.
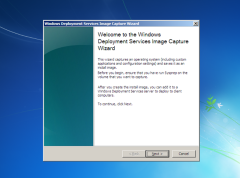
This will load the Capture wizard that guides you through the process. It’s very simple but there are a couple of things to note. It will only let you capture a partition that has been syspreped, otherwise it will just show a blank. Also, you can choose to save the image to a partition and upload it to the WDS server at the same time. This makes things a lot easier, just make sure that you fill out all the boxes in order for it to work.
This process will take a while depending on how big you image is. Mine took 7 minutes to capture a 1.3GB image
Step 5 – Deploy the Image
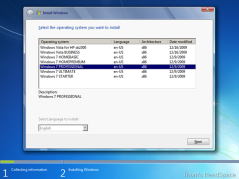 We’re almost there! This process is similar to the capture step above. Boot from the network but this time choose the “Install Windows” option from the WDS screen. This will load a GUI similar to the Windows 7 setup. It will list any images that are compatible with the PCs HAL type**. Hopefully, it will recognise the XP capture we created in Step 3 and we can deploy it. This took about 9 minutes on the laptop I was deploying it to. It will now go through the usual XP setup process and you will be left with a happy operating system
**Newer WIMs (like Vista or Win7) don’t care what HAL you have but XP is more picky. You can see the HAL type of your image by looking at the properties of it in the WDS console. Mine says acpiapic_mp, whereas another I created from a virtual machine is acpipic_up. The _up HAL only shows up on virtual machines but the _mp HAL from my physical Reference PC seems to work on most modern motherboards.
Further Adventures
WDS can be used for a lot more than deploying XP images. As I mentioned earlier, the process of deploying Vista or Windows 7 is much more straightforward. The same goes for Server OSes too. I added Server 2008 WIMs from the media kit as well as the new version of Hyper-V 2008 R2. No more burning ISOs for me!
I also added other boot images, so I can troubleshoot computers without loading the installed operating system. For example, I added the Windows Pre-installation Environment (WinPE) from a 2008 R2 OEM Preinstallation Kit. I could then add tools and drivers to this boot image to use on any PC regardless of its primary OS. I also intalled the Windows Recovery Environment (WinRE) by following the easy guide here.
WDS forms the basis of many of the Windows Deployment Tools, so by getting a simple start with this you should be in good stead to dive deeper when necessary.
Do you use your WDS server for anything else interesting? Are you having problems getting yours up and running? Please add your comments below.
Sources and More Info
I used the following sites to help me gather this information
Hi,I have created one WDS image of Windows XP, & when i am going to deploy the image,i am getting error(wdsclient:There was a problem processing the selected image). could you please help me on this. it’s very urjent for me.Thanks in advance.Parthasarathi dash
LikeLike
Brilliant guide – Will try it out when I get the time
LikeLike
THANK YOU!!@!!!!!!!! !@#$%^&*(
GReat!!!!
LikeLike
Where is the Capture Image?
LikeLike
You create this in the WDS console
LikeLike
Great stuff but I have a question: Instead of a “reference PC”, can you sysprep xp which is installed/running under Hyper-V?
The machine I want to put XP on has no way to boot except from network!
Thanks
LikeLike
Yes that would work in exactly the same way
LikeLike
Wouldn’t that fail because the HAL on the Hyper-V would be different than the computer XP was being deployed? If not how do you compensate for the different HAL’s?
LikeLike
@Jason, it;s been a while since I tried. It definitely works for Windows 7 computers but I’m not sure about XP.
They definitely do have different HALs but I think there is a way of changing the VM HAL to one compatible with the target PC. IIRC you need to change a certain driver in Device Manager to something other than the default, I think it is the ACPI driver?
If anyone gets a definite answer, please report back 🙂
LikeLike
@Thom If I read the below KB correctly it looks like there are 6 different HAL types for WinXP and 2003. If you captured an installation of one of the HAL types, it could be deployed to a computer with the same HAL type.
http://support.microsoft.com/kb/309283/lt?wa=wsignin1.0
LikeLike
These two articles explain to some length how to get creative with working around the limitation of XP’s HAL.
http://blog.remyservices.net/2007/09/28/sysprep-in-depth-part-3-sysprepinf-and-hals/
http://www.symantec.com/connect/articles/windows-xp-sp3-out-time-rebuild-those-base-images
LikeLike
You did not mention which version of the Windows 7 disc you pulled the boot.wim from, x86 or x64. I used the x64 disc which I learned will not show you x86 images. Once I loaded a x86 version of the boot.wim I could now see both x86 and x64 images.
LikeLike
Install image missing network drivers
LikeLike
What do you mean by that?
If you give a few more details I may be able to help
LikeLike
(wdsclient:There was a problem processing the selected image). could you please help me on this. it’s very urjent for me.Thanks in advance.Parthasarathi dash
I was refering to the above. Add the driver package to the install/capture image. The above error means the nic drivers are missing
LikeLike
Oh I see, since that was posted in 2010 I hope he hasn’t been sitting refreshing these comments since then lol
Thanks for the clarification
LikeLike
LOL..I should have looked at the post date before answering it
LikeLike
Thom, I have tried a couple of times now to use the sysprep GUI and each time when I go to deploy the image it will not read the sysprep.inf file. However, when I use the CLI (sysprep -mini -reseal -reboot) it reads the file just fine and finishes the install.
LikeLike
Let me amend that I got the GUI to work. The use mini setup check box needs to be set.
LikeLike
The Russian article linked above shows ways to add more versatility to WDS like adding Linux options
LikeLike
Thanks
LikeLike
hii
In Step 4 when i m booting Reference pc from network.
my pc boot from network but when setup starting (before i choose capture image)
I get an error
WdsClient: An error occurred while starting networking: a matching network card driver was not found in this image. Please have your Administrator add the network driver for this machine to the Windows PE image on the Windows Deployment Services server.
LikeLike
That’s unusual, they tend to use legacy network card drivers to at least start off the capture.
You can inject drivers into the boot image but I can’t recall how to do it from the top of my head, sorry
LikeLike
Hello I am stuck…..there is a crucial part of the instructions that appears to be missing.
I have already setup my boot image and all install images for all operating systems except XP, following the instructions to add another boot image I have done this but when right clicking on this newly created boot image to capture, the wizard opens I name it Capture PC Image and describe the same but then in order to click next I have to browse the location of the WIN file name, this is where I get stuck, in the instructions it just says save but you cant save until you’ve selected a WIN file, which file is to be selected? I selected a WIN file from a previous boot setup but get an error “Image file name already exists. Do you want to append to the existing file?”
Server 2008 R2 enterprise
Thanks for any help
LikeLike
Yes, that is a bit confusing at first!
The wizard is not actually asking you to select an existing file, it just wants to know the folder path and file name to use
You can save it anywhere you like, in fact I’d recommend saving it somewhere outside the default RemoteInstall directory
For example, in the Location and filename box, you could put something like
Y:\Workspace\capture test.WIMor
C:\temp\capture.wimBy the way make sure you specify it as a WIM file not WIN as you described, there’s no such thing!
LikeLike
Thank you very much for your rapid response with solution, I’ve managed to get past this now.
LikeLike