![]() If you are trying to deploy a click-to-run (C2R) version of Office 2013/365 then it’s time to forget everything you knew about deploying office and start from a clean slate!
If you are trying to deploy a click-to-run (C2R) version of Office 2013/365 then it’s time to forget everything you knew about deploying office and start from a clean slate!
Due to Office 2013’s Cloud-based nature it is set up a bit differently to the traditional CD/MSI approach. This is fine if it’s your personal copy but what about deploying it to an whole office of PCs?
IT pros have been using the Microsoft Installer (MSI) technology for years to silently install Office programs. You can use a mix of existing switches to update and patch Office installations using Group Policy, scripts, Office Customization Tool (OCT) or the Microsoft Deployment Toolkit (MDT). However, Microsoft, in their wisdom, decided to offer a brand new deployment methodology for Office 2013, Click-To-Run. There is still an MSI version out there but it is only available for the Volume Licensed customers, which means, if your business was used to buying the much cheaper Product Key Card (PKC) licenses, you are stuck with C2R. Oh, and by the way, WSUS can’t be used to update it either.
We came across this issue when we purchased and job lot of PKCs for Office Home and Business 2013. This includes Outlook, Word, Excel, PowerPoint and OneNote. This seems like an ideal buy for most small businesses as it includes all of the core Office apps that your average user would need. However, when it comes to deploying, customising and activating it is about as far from business-ready as you can get! I struggled for weeks trying to get things working correctly to allow a smooth integration with our Windows 7 deployment, I did finally get there, but I hit so many brick walls I almost gave up trying. The worst part is when you get a stock “You should buy Volume Licenses” response… erm yeh, I wish I knew that 3 months ago before the money was spent.
So here is my ultimate guide to installing, customising and activating Office 2013 C2R editions. It’s not going to be pretty but it will get you someway to a mostly automated and controlled deployment. It is specifically tailored towards Office 2013 Home and Business but should work for any Office 2013 C2R version that needs to be deployed in a Windows Domain
Step 1 – The Office Deployment Tool
Step 2 – Installing Office
Step 3 – Semi-Automatic Activation
Step 4 – Customise First Run with Group Policy
Step 1 – The Office Deployment Tool
The first piece of the puzzle is the Office Deployment Tool (ODT). This little tool is a 900kb exe file that can download, configure, install and remove a Click-to-Run version of Office by linking it with a small XML file. If you are using the MSI installer files instead, you would use the Office Customization Tool. The OCT is not of any use with C2R so if you have been looking into that forget about it!
After you have got the ODT the first step is to master configuration.xml files. The ODT comes with an example configuration.xml file but you can use as many XML files as necessary or, if you prefer, one big combined one. I have broken mine up in to separate files to add a bit of clarity. There is some pretty decent documentation on TechNet about all this, Deploy Office 2013 from a network installation point, but I’ll cut out the bloat and just tell you what to do!
- Create a network share to install Office 2013 from, e.g. \\FileServer\Office2013
- Put the ODT setup.exe in the root of the share
- Create a blank XML file to suit your version of Office, below is an example, download.xml, but you can find out all of the other bits back on technet – Reference for Click-to-Run configuration.xml file
<!-- download.xml - This XML file downloads Office 2013 Home & Business 32-bit -->
<Configuration>
<Add SourcePath="\\FileServer\Office2013" OfficeClientEdition="32" >
<Product ID="HomeBusinessRetail">
<Language ID="en-us" />
</Product>
</Add>
</Configuration>
- Download the source files with the following command
\\FileServer\Office2013\setup.exe /download \\FileServer\Office2013\download.xml
- This will create a sub-folder (e.g. \\FileServer\Office2013\Office\Data\15.0.4605.1003) containing the latest version of the source files for Office Home and Business, as specified in the <Add> section of the XML file. The version above is just over 1GB in size.
Step 2 – Installing Office
Now you have the latest source files on your installation share, it is time to install. This step still uses the ODT’s setup.exe but needs some extra lines in the XML file. They are pretty self-explanatory, there are lines to say how the Client PCs get activated, the display level, and where they should look for updates. Here is an example install.xml file
<!-- install.xml - This XML file installs Office 2013 Home & Business 32-bit -->
 <Configuration>
 <Add SourcePath="\\FileServer\Office2013" OfficeClientEdition="32" >
 <Product ID="HomeBusinessRetail">
 <Language ID="en-us" />
 </Product>
 </Add>
 </Configuration>
 <Updates Enabled="TRUE" UpdatePath="\\FileServer\Office2013" />
 <Display Level="None" AcceptEULA="TRUE" />
 <Logging Level="Standard" Path="%temp%" />
 <Property Name="AUTOACTIVATE" Value="0" />
A quick note on updates
WSUS isn’t involved with C2R installations. During installation, Office adds a scheduled task to the client PC to regularly check for updates from the source specified in the XML file. Office clients will either look directly to the Microsoft servers for updates, or to an installation source that you specify. As most businesses want some element of control over updates, I’d recommend choosing the latter option. If you need to retroactively add or change the update location, you can modify the following registry key on the clients
HKLM\SOFTWARE\Microsoft\Office\15.0\ClickToRun\Configuration\UpdateUrl="\\\\FileServer\\Office2013"
There is a good article about this on the Office IT Pro Blog that talks you through automating the monthly “Patch Tuesday” updates to a testing environment. That’s worth a look before you start deployment as it may change the way you use the XML configuration files (it says it is for O365 ProPlus but the instructions are relevant for any C2R deployment).
Test the install
If you want to test your install, use the following command from a test PC to install Office (you may want to change the Display level to “Full” so you can see what is happening).
\\FileServer\Office2013\setup.exe /configure \\FileServer\Office2013\install.xml
If that works OK then you are ready to deploy Office via a logon script or your favourite deployment method to any domain joined PC
Silently install Office C2R via MDT
This part gave me a real headache, it should have been so simple but I finally managed to get it working thanks to some custom commands in the MDT Task Sequence (TS).
If you try deploying Office C2R as an Application package in MDT ti will fail with the following error
Access denied to installation source
Sorry, we ran into a problem accessing a required file. Please check that the installation source has correct permissions, the try again.
Go online for additional help
Error Code: 5-4
That Go online for additional help bit was exactly what I did but unfortunately, no help was readily available. I ended up posting the error into the Office Tech Center and luckily I got enough advice to speed me on my way.
The problem comes down to permission issues of the PC due to it not being a member of the domain. The solution is to either, join the PC to the domain as part of the TS or to use a combo of Robocopy and a custom Office config.xml. I chose the latter option, as I don’t really want PCs joined to my domain until they are ready to be used.
The process is quite simple but it takes a bit of mind-bending logic to join all the locations up (in my head at least!).
Create a custom config.xml
As we are going to be copying the Office source files to the local PC, we will need to use a different config.xml file to avoid the MDT Task Sequence looking for the network copy. If you are going to be using the controlled update mechanism, as mentioned above, then you will need to make sure the Update section is pointing to the network share.
Make sure this config file is saved in the root folder of the Office share as it will need to be copied along with setup.exe and the source files. The Office share folder structure should look similar to this
- \\FileServer\Office2013\ (network share for all of the Office bits)
- \\FileServer\Office2013\setup.exe (the Office Deployment Tool)
- \\FileServer\Office2013\config-mdt.xml (the custom XML configuration file)
- \\FileServer\Office2013\Office\ (the previously download C2R setup files)
Here’s an example config-mdt.xml file. Note the SourcePath points to the local PC but UpdatePath points to the network.
<!-- config-mdt.xml - This XML file installs Office 2013 Home & Business 32-bit but only works for MDT-->
<Configuration>
   <Add SourcePath="%SystemDrive%\Deploy\Applications\Office2013\" OfficeClientEdition="32">
      <Product ID="HomeBusinessRetail">
         <Language ID="en-us" />
      </Product>
   </Add>
   <Display Level="None" AcceptEULA="TRUE" />
   <Logging Level="Standard" />
   <Property Name="AUTOACTIVATE" Value="0" />
   <Updates Enabled="TRUE" UpdatePath="\\FileServer\Office2013\" />
 </Configuration>
Copy the Office source files to the local PC

- In the State Restore section of your TS click Add > General > Run Command Line
- Give it a name e.g. Copy Office 2013 Source
- Add the following command line
-
robocopy \\FileServer\Office2013\Updates\TestingGroup\ c:\minint\Office2013\ /MIR /LOG:%TEMP%\office2013-copy.log
- Breaking this command down
- robocopy – this is included in Windows 7 by default
- \\FileServer\Office2013\Updates\TestingGroup\ – This is the location of the Office source files. Note; If you followed my note regarding Office updates , you’ll want to point RoboCopy to the latest files available
- c:\minint\Office2013\ – This is the destination for the source files. Using the MiniNT folder means that any copied files will be deleted as part of the final LiteTouch Cleanup process
- /MIR – This switch makes the source and destination folders mirror each other, i.e. any thing from the source location will be copied to the destination
- /LOG:%TEMP%\office2013-copy.log – This sticks a log file of the copy process in the local admins temp directory
-
- The “Start in” box can be left empty
- IMPORTANT; tick the box “Run this step as the following account and set it to a user with read and write permissions to both locations
Install Office

Now we have a copy of the Office 2013 setup files in the local computer we can set up a task to install Office using the custom config-mdt.xml file
- In the State Restore section of your TS, under the previous step we just added, click Add > General > Run Command Line
- Give it a name e.g. Install Office 2013
- Add the following command line
-
setup.exe /configure c:\MININT\Office2013\config-mdt.xml
-
- The “Start in” box should point to where setup.exe has been copied to
-
c:\MININT\Office2013\
-
That’s all there is to it! The task will silently install Office 2013 and then carry on with the rest of the Task Sequence. When the LiteTouch installation is complete the MiniNT folder gets deleted meaning there will be no redundant Office source files on the local PC
Step 3 – Semi-Automatic Activation
The next challenge with the Home and Business edition is that you need to activate every installation manually by entering a product key on the Office website. After doing this about 20 times I was ready to pull my hair out! However, I wrote a batch script to save a few mouse clicks instead (not many but anything helps!).
Here is the script and read on for a walkthrough guide on how it works
TITLE Activate Office 2013 - RUN AS ADMIN
@echo off
cls

echo Step 1/4 - Open Word and enter a Product Key Card
"C:\Program Files\Microsoft Office 15\root\office15\WINWORD.EXE"
echo.

echo Step 2/4 - Redeem the key online via Word and copy the ACTIVATION product key from the "I have a Disc" section on Office.com
echo.

set /p strRedeemedKey= Step 3/4 - Paste the ACTIVATION key from Office.com:
cscript "c:\Program Files (x86)\Microsoft Office\Office15\OSPP.VBS" /inpkey:%strRedeemedKey%
echo.

echo Step 4/4 - Activate Office
cscript "c:\Program Files (x86)\Microsoft Office\Office15\OSPP.VBS" /act

echo.
pause
You must run the script as an admin user. The batch file uses a special VBScript that comes as part of the Office installation – OSPP.VBS found in C:\Program Files (x86)\Microsoft Office\Office15. You can also use this VBScript for other functions, like removing a failed key. Run it with the -? switch to see all of the options
Script Step 1 of 4
Step 1 deals with redeeming the Product Key Card code via Microsoft Word
- Launching the batch script opens Word and triggers the activation prompt
- Click Enter a product key instead

- Type the code from an Office 2013 Product Key Card (PKC) and click Continue

- Click Redeem Online

- A web page opens up the office.com website


Script Step 2 of 4
This step involves registering the PKC code to a Microsoft Account. Please note:
- Each Microsoft Account can only activate up to 30 copies of Office. This means, if you need to activate 90 copies of Office, you will need at least 3 different Microsoft Accounts
- We created one account for our IT department’s group email and then added a new alias to that mailbox for each subsequent Microsoft Account. E.G. it@company.com, it2@company.com, it3@company.com etc.
- Log down the relevant account on the physical PKC or a spreadsheet to jog your memory if you need to re-activate
- Sign in with a Microsoft Account
- Select United Kingdom and English (as applicable) and click Continue
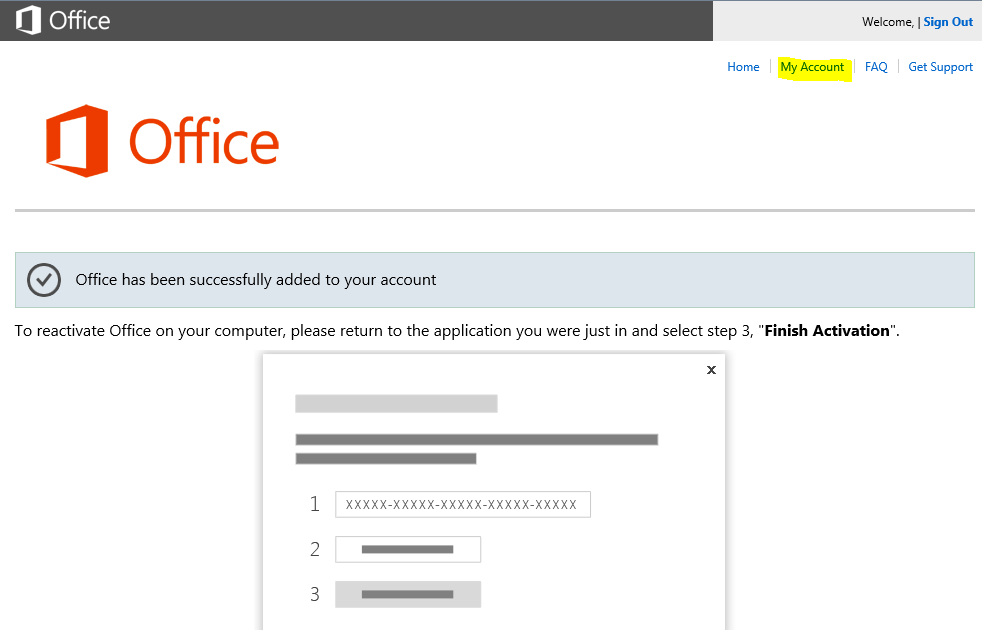
- It should say Activation has been successful, click the My Account link

- You will see a list of all of the PKCs activated with that Microsoft Account. The key you just activated should be top of the list but there is no real identifiable way to know what list item relates to what PKC (this is a royal PITA)
- You now need to retrieve the Activation code. Click Install from a disc
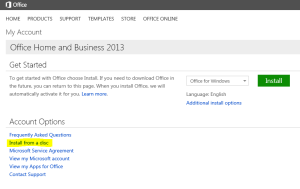
- Click I want to burn a Disc
- Click View Product Key

- Copy this key to the clipboard (and maybe to notepad to be safe)
- Close Internet Explorer
- Cancel the activation screen in Word and close it down (ignore any message boxes)


Script Step 3 of 4
Registering the Office.com key
- After closing Word, the batch script will move on to this step automatically
- Past the key from Office.com into the command prompt and press enter
- CSCRIPT “C:\Program Files (x86)\Microsoft Office\Office15\OSPP.VBS” /inpkey:1234-5678-ABCDE-FGHIJ-KLMNO
- CSCRIPT “C:\Program Files (x86)\Microsoft Office\Office15\OSPP.VBS” /inpkey:1234-5678-ABCDE-FGHIJ-KLMNO
- The above command registers the key to the locally installed software

Script Step 4 of 4
The final step is to actually activate the Office install
- Activate the key with the /act switch
- CSCRIPT “C:\Program Files (x86)\Microsoft Office\Office15\OSPP.VBS” /act

- If the activation is unsuccessful it means you have picked the wrong list item from the office.com website. Go back and try to find another one
- CSCRIPT “C:\Program Files (x86)\Microsoft Office\Office15\OSPP.VBS” /act
- If you want to double-check Office has activated properly, re-open Word, at the New Document screen click Open other documents to open the regular File menu and look under the Account section

As I mentioned earlier, it is a good idea to keep track of all of this in a spreadsheet. I have one with the following columns:
- PC Name
- Product Key Card code
- PKC Asset tag (I stick a tag on each PKC)
- Activation Key (this is the one from the Office.com website)
- Microsoft Account used (remember, you get only 30 activations per account)
- Date Activated
Step 4 – Customise First Run with Group Policy
We can use Group Policy to avoid users having to go through the First Run screens, blocking signing in to the Microsoft consumer services (OneDrive etc.) and some other useful tweaks. I created an Office 2013 GPO to keep all of my tweaks together. They are a mix of the official Microsoft Office ADMX files as well as a few registry preferences. All can be applied under the User Configuration section. Obviously, make sure you read the info in the Group Policy Editor so you under stand each setting (or use the GPOSearch Website)
- Administrative Templates/Microsoft Office 2013/First Run
- Disable First Run Movie = Enabled
- Disable Office First Run on application boot = Enabled
- Administrative Templates/Microsoft Office 2013/Miscellaneous
- Block signing into Office = Enabled – None Allowed
- Disable the Office Start screen for all Office applications = Enabled
- Show OneDrive Sign In = Disabled
- Suppress recommended settings dialog = Enabled
- Administrative Templates/Microsoft Office 2013/Privacy/Trust Center
- Disable Opt-in Wizard on first run = Enabled
- Enable Customer Experience Improvement Program = Disabled
- Preferences/Window Settings/Registry
- BootedRTM – Disables some First Run elements
- Key: HKCU\Software\Microsoft\Office\15.0\FirstRun\
- Value: BootedRTM = 1 (REG_DWORD)
- ShownFileFmtPrompt – Prevents European Office vs OpenOffice file format prompt
- Key: HKCU\Software\Microsoft\Office\15.0\Common\General
- Value: ShownFileFmtPrompt = 1 (REG_DWORD)
- BootedRTM – Disables some First Run elements
Feedback wanted!
I’m not sure if it would’ve been better to break this up into a series of posts as it is all a bit TL:DR.
Is having it all contained in one post helpful or does it overcomplicate the process? Please let me know you opinion, questions or tips in the comments!

Hi Thom,
I’ve made a simular setup with O365 ProPlus which works fine with domain joined PC’s – but ran into the same “C2R Client returned failing error code 17002” error with domain joined 32-bit PCs. 64-bit PCs work file…
Was hoping to see a fix and read your Technet thread.
As we have very few 32-bit PC’s i’ll use your robocopy command, and delete the Office folder off the client PC’s after installation.
One thing I noticed was that our previous Danish Office 2007/2010 versions signature folder was named ‘Signaturer’ and the new folder was named ‘Signatures’ – I then used these commands to copy the users signatures to the new location:
(md “C:\Users\%username%\AppData\Roaming\Microsoft\Signatures”)
(xcopy /E /C /I /H /R /K /Y “C:\Users\%username%\AppData\Roaming\Microsoft\Signaturer\” “C:\Users\%username%\AppData\Roaming\Microsoft\Signatures\”)
Good article and I think it’s better to have all this information contained in one post – looking forward to step 3 and 4.
Thanks.
LikeLike
Thanks for the feedback. All my PCs are x64 Windows with x86 Office and they were all getting the error.
Glad I could be of some help!
LikeLike
Click to Run is an enterprise nightmare for three primary reasons:
1) Requires local machine permissions to install from network.
2) Does not use WSUS to update.
3) Complicated and un-customizable setup/intall.
Because of these issues I have decided to mass deploy a single copy of Office 2013 VL and use the one MAK key with 50 registers on it. Once we run out of our 50 MAK registers, we will just buy a second VL to get another 50. Hopefully by then M$ will get their $hit together regarding this C2R crap that has NO PLACE in an enterprise environment.
IMHO this not license cheating! I am paying $20/month/user for Office 365 E3. With that I should be able to deploy up to 5 copies of Office 2013 to any users I want, any way I want. Well I dont want C2R!
My only concern is what features or functionality I might be loosing using a VL copy versus a C2R copy in an O365 environment. Comments?
LikeLike
I was under the impression that Office 365 users had the option of using the MSI but I can’t find that article anywhere so maybe I imagined it!?
It may be worth speaking to a Microsoft Licensing expert or reseller to see if what you propose to do with the VL copy will cover you, just in case you get audited.
My article is talking about the non-O365 Home & Business edition but you could still use the info and tips on it to get it working alongside all your current deployment and update services.
It’s a shame they mae it so difficult for business IT departments. It seems like they are putting a lot of the control in the hands of the end-user, which we all know is a bad idea 😉
LikeLike
Thanks for posting a guide for this.
Using an MDT Integrated SCCM task installed it flawlessly. I had my “Install Applications” node right after joining the machine to the domain.
LikeLike
Steps 3 & 4 have now been added to this article 🙂
LikeLike
I’m trying to deploy Office 365. I’m running into a problem during the “Copy Office 365” step. “The directory cannot be removed”
Any ideas?
The command:
robocopy “\\pretend.com\Public\Office365” “c:\MININT\Office365” /LOG:%TEMP%\office365.log
The account is a domain account that has read privileges on the share. I’m not sure what access the user has to C:\MININT\Office365…
LikeLike
The MDT prices had full access to the MININT folder.
Does u it work if you run the command manually on the client PC?
Try adding /MIR on the end of the robocopy command, that makes it copy an exact mirror of the folder
LikeLike
You can install directly from the network share prior to joining the domain; just use Everyone permissions on the Office share. I used a hidden share to prevent unwanted access.
Obviously this isn’t ideal in a highly secure environment, but since any user would have to know the command line options to actually install Office, in this situation I wasn’t concerned.
LikeLike
Glad that worked for you, it certainly didn’t in my environment!
LikeLike
Step 2 xml is invalid and won’t work.
LikeLike
It definitely worked for me at the time. Unfortunately I don’t have access to the same kind of test set up nowadays so I can’t double check. Please feed back if you find some valid data
LikeLike
hi Thom.
To resolve issue with domain share access, it will be better to use a vm with debian/samba (using a hyper-v and debian .. both free). The mdt process is much faster in that case.
LikeLike
If you use psappdeploytoolkit, there is an example script for deploying Office 2013 and it works a treat. The fact that you may also display customizable information to end users during install is a nice bonus.
LikeLike
Cool Blog Entry.
Do you have any expirence in deploying office silently with MDT but without installing the OS.
So i mean, is it possible to execute a task create in MDT without OS deployment. Export the task script or some how?
thanks!
LikeLike
The one issue that I keep coming across is that MDT doesn’t know when the Office 365 install is actually complete and then moves on to something else. So if you are trying to install multiple apps the setup.exe installer has closed already but click-to-run is still installing Office. If the computer restarts of starts installing something else or worse Windows updates this will cause issues.
Is there any way around this?
LikeLike
Im not sure but I think you can do a “wait” task sequence. Not sure how but I think it keeps checking for a file & doesn’t move on until it’s there
LikeLike
Hi TOM , my problem is a update, i read for the registry keys with path for update, but i don’t understand where is a procedure for download and update after first installation.
Thanks and regards
Giulio
LikeLike
Use replace instead of update
LikeLike
Can I pick your brain regarding the install office part?
My task sequence successfully copies over the office install files, but then fails at the next step. There aren’t any helpful logs as to why it’s failing.
At first, I thought it was because the script couldn’t find setup.exe because I was only copying over the Updates folder. I adjusted things to copy everything and I’m still getting the error.
Litetouch deployment failed. Return code = -2147467259
On the install-mdt.xml, I have “Add SourcePath=”C:\MININT\OfficeO365\” OfficeClientEdition=”32″”
For the task sequence,
setup.exe /configure c:\MININT\OfficeO365\install-mdt.xml
with start in: c:\MININT\OfficeO365\
I’m probably missing something obvious but have the blinders on.
LikeLike
I can’t see anything obviously wrong. It may be that the syntax has changed since I worked on this.
I’d recommend checking the XML files have all the required lines in and that any TS commands have the correct syntax.
Sorry I couldn’t have been more help, please share if you find out what went wrong
LikeLike
Everything started working once I removed the “Start in” part of the sequence – and just pointed the whole command at the network share. For some reason though, running the commands manually (both the robocopy and the install) would work without a problem. It’s only when MDT ran that same command that it would break.
I’m at the point where I’ve got it working but only when installing from the network share. (Which is fine, really)
LikeLike
When trying to test on a domain machine, I got ‘0-1008’ error.
In log, I saw “load: failed while trying to load data out of”.
Then, in ‘install.xml’, I spotted that the tag was inserted before ‘<updates…..' .
Moving the tag to end of file fixed the problem for me.
Under ‘Installing Office’ the code is not correct, but under ‘Create a custom..’ the code is correct with the at the end.
Thanks for a great article.
LikeLike
Tag was removed from post. corrections:
* I spotted that the ending of the configuration tag..
*but under ‘Create a custom..’ the code is correct with ending of the configuration tag at the end of file.
LikeLike
This post gave me a start in the right direction, however, trying to follow directly my installs of Office 2016 C2R were failing with a file not found message. I believe the MDT task sequence was moving on before setup was complete and MDT cleanup was removing files from C:\MININT. I switched to the following command to use PowerShell and install completes successfully.
powershell.exe -command start-process -filepath c:\minint\Office\setup.exe -argumentlist ‘/configure c:\minint\office\configuration.xml’ -wait
LikeLike
This C2R is a total PITA!! F###ing shite… how much time is needed to faf around with it. Sigh… Thank god for LibreOffice.org
LikeLike